

Fall is on the horizon and it's time to wrap up things in the garden and save some seeds for next year, which is one of my favourite things to do in the garden.
Saving seeds is great to help you become just a little more self-sufficient, saves you money year after year in the garden and can help you develop better, stronger plants through seed selection over the years!
Before we dive right in, there are a few terms you need to know about your seeds and how they are pollinated. You'll want to know whether the seeds from your plant are open-pollinated, hybrids or heirloom seeds. This is important because it effects how you save the seeds. Let's break down what these terms mean...
You can also seed save from closed-pollinated plants. These are plants that pollinate themselves and are
There are really two different seed saving methods for different kinds of plants and seeds, dry seeds and wet seeds.
Dry seeds are seeds from most flowers and some vegetables, such as bush beans, pole beans, peas, onions, carrots, lettuce, chives, basil, sunflowers etc. Harvesting these dry seeds is really simple. On a dry and sunny day, you simply cut off the flower heads, or pull the dried bean or pea pod off the plant when they are fully ripened and dried.
Wet seeds are seeds from fleshy fruits and vegetables, like as tomatoes, pumpkins, cucumbers, squash, zucchini, and peppers. Saving wet seeds is a little more work and requires more patience. You will need to let the plant and it's fruit to fully mature and ripen before harvesting the fruit. Once the fruit from your vegetable plant is fully ripened, open it up and scoop out the mature seeds with a spoon and rinse in a sieve to remove the pulp.
Some wet seeds such as tomatoes, cucumbers, and zucchini need to be fermented and have a protective jelly layer broken down. Simply place the seeds and pulp in a jar of water and leave it in a warm place and cover it with a coffee filter secured with a rubber band or twine. After about 3 days, you can rinse and clean the seeds in a sieve. Allow to dry fully before storing.


Saving seeds is great to help you become just a little more self-sufficient, saves you money year after year in the garden and can help you develop better, stronger plants through seed selection over the years!
Before we dive right in, there are a few terms you need to know about your seeds and how they are pollinated. You'll want to know whether the seeds from your plant are open-pollinated, hybrids or heirloom seeds. This is important because it effects how you save the seeds. Let's break down what these terms mean...
What does open-pollinated mean?
Open pollinated plants start with seeds that come from plants that are pollinated through the wind or pollinating insects and will reproduce seeds that are true to their parent plant. There are no surprises in what will grow from the seeds you'll save so can save seeds from open pollinated plants.You can also seed save from closed-pollinated plants. These are plants that pollinate themselves and are
What is an hybrid seed?
Hybrids are plants created by humans who deliberately cross-breed two different plants to make a new variety of plant that has certain characteristics from both parent plants. If you save seeds from a hybrid plant, when you replant the seed, the plant that grows won’t necessarily be the same as the plant that you saved the seed from. It will grow to be similar to one of the parent plants that were used to create the hybrid plant, or it will be a strange combination of the two that may or may not be edible. But if you are going through all this effort to save a delicious variety you know you love, skip saving seeds from hybrid plants.What is an heirloom seed?
Heirloom seeds are open-pollinated seeds that have been carefully selected from the healthiest, most productive plants and passed down through generations. These are a fantastic choice for seed saving! All heirloom plants are open-pollinated plants, but not all open-pollinated plants are heirloom plants. Still, either or will produce seeds that can be saved.
If you are unsure what kind of seeds you have, refer back to the package where your seeds came from. OP is for open pollinated. F1 or F2 are hybrid seeds in their first or second generation and heirloom seeds will be proudly labelled as such!
 |
| Let your beans and peas fully ripen, mature and dry on the plant to save seeds from them. |
There are really two different seed saving methods for different kinds of plants and seeds, dry seeds and wet seeds.
Dry seeds are seeds from most flowers and some vegetables, such as bush beans, pole beans, peas, onions, carrots, lettuce, chives, basil, sunflowers etc. Harvesting these dry seeds is really simple. On a dry and sunny day, you simply cut off the flower heads, or pull the dried bean or pea pod off the plant when they are fully ripened and dried.
Wet seeds are seeds from fleshy fruits and vegetables, like as tomatoes, pumpkins, cucumbers, squash, zucchini, and peppers. Saving wet seeds is a little more work and requires more patience. You will need to let the plant and it's fruit to fully mature and ripen before harvesting the fruit. Once the fruit from your vegetable plant is fully ripened, open it up and scoop out the mature seeds with a spoon and rinse in a sieve to remove the pulp.
You can test the viablity of wet seeds before drying and storing wet seeds by soaking them in a jar of water for a few minutes. Viable seeds will sink to the bottom, bad seeds will float!
Some wet seeds such as tomatoes, cucumbers, and zucchini need to be fermented and have a protective jelly layer broken down. Simply place the seeds and pulp in a jar of water and leave it in a warm place and cover it with a coffee filter secured with a rubber band or twine. After about 3 days, you can rinse and clean the seeds in a sieve. Allow to dry fully before storing.
How do you save bean and pea seeds?
Bush bean, pole beans and peas are the easiest to seed save from. When harvesting throughout the summer I will choose one or two plants that have the most and biggest beans or peas on the plant and I will leave it alone and let them fully ripen on the plant. Once they are hard and completely dry, I will pick them and bring them inside. In the winter months, I will shell these, place them in a plastic bags when they are completely dry and label them.
You could mark plants you want to seed save from by tying a ribbon on the plant.

How do you save lettuce, kale, swiss chard and spinach seeds?
Similar to the beans, I will choose one plant of each variety to bolt. Bolting happens when we let the plant fully mature and it sets flowers for seed. Typically these leafy vegetable plants won't taste very good once they start to bolt, grow tall and leggy to produce flowers but I am sure to leave them in the garden rather than pulling out to plant something else.
Once the plant has flowered, the seeds will begin to form. Be sure to let the flowers completely die off before cutting the flower heads off into a jar or paper bag.
How do you save seeds from tomatoes, cucumbers, zucchinis and such?
NOTE: If you intend to save seeds from tomatoes or squashes (cucumber, zucchini, pumpkins, pickles, are all squashes), you will need to ensure they are not cross pollinated with other varieties. As soon as your tomato plant or squash begins to flower, you will need to place a paper bag, or mesh bag over the flower to ensure pollinators do not bring pollen from another variety in order to stay true to the mother plant.
If a bee visits a zucchini plant flower before your pickling cucumber flower plant you want to save seeds from. You might end up growing a zucchini pickle plant! And who knows what that'll actually taste like!
These are wet seeds and they require an extra step. You will want the fruit from these plants you want to save seed from grow beyond anything you would eat, but before they begin to rot. Once they are fully matured you are able to pick the tomatoes, zucchini or cucumber and scoop out the seeds. But because they have a jelly protective layer over the seeds, you will need to ferment the seeds in a jar of water for a few days to break this layer down. Afterwards you'll rinse your seeds in a sieve and place on a plate to fully dry before storing.

How to Butcher and Skin a Chicken Step-by-Step, with pictures!
By The Petite Plantation - September 14, 2020
This post is not for the faint of heart. Today I am sharing how we butcher and skin our chickens to preserve the harvest.
It's always a somber day when it's butcher day but we take comfort in knowing that these chickens that become a nourishing meal for our family, they had a much better life than ANY chicken we have ever bought from the grocery store.
They got to frolic, scratch, eat bugs and weeds and always got the most desirable kitchen scraps.
This is their one bad day.
Why would you want to skin a chicken?
Skinning a chicken is easier than plucking and even though there are machines that do the plucking, this is simpler, cleaner, and doesn't require extra machines.
We're also living off the grid with minimal power and running water!
How do you skin a chicken?
This is your warning! There are pictures of a dead chicken so if you don't want to see a dead chicken, stop scrolling!

I always start with the legs, then the wings. With the chicken breast side up I take the first leg and find the space between the joint above it's foot and make the first cut into the joint.

You can bend the foot up and down to see the joint move to find this space. Once you have sliced into the joint, you can further flex the joint to cut the tendons that will loosen up the joint. (see above how I have bend it more)

I also cut on either side of the joint through the skin to make the next step easier.

I set my knife down and hang on to either side and give it a good twist to break it apart. You could also use garden pruning sheers at this point and you'll be able to cut off the foot.

With my knife under neath the joint, I make my last cut to free the foot. Next I remove the wings.

I remove the wing at the second joint from the end of the wing. (my thumb is holding the first joint and the knife is pointing to the second joint)

From the top of the wing, I cut through the skin and feathers to the joint.

I use my hands to twist and separate the joint, and like I removed the foot, I place the knife underneath the broken joint for a final cut. Next I'm going to remove the chicken's skin.

Follow the breast bone with your fingers to find the end. This will be at the top of the chicken soft stomach. With one hand pulling up the skin, I make a shallow cut big enough that I can put my fingers in to pull it apart.

Using my hands I will make the hole big enough that I can get a good grip to rip the skin.

Pulling apart, I pull the skin and my hands towards the top and bottom of the chicken swiftly and firmly. If your chicken is young, this will be a breeze.

Because of the way I pull the skin, I've created this flap of skin I need to slice in half to continue skinning the chicken.

Slicing it creates two new flaps I pull apart to really expose the breasts.

Now I place my knife under the skin towards the neck and head. If you haven't already removed the head, this is the time to do so.

Once this is cut I can remove the rest of the skin from the neck.

Now that the breast and neck are skinned, we start on the legs and what is left of the wings.

Gently pulling the skin away from the leg, I can break through the fascia with my fingers for a better grip and pull the skin off the leg.

If there is still feathers or skin in the end after you've pulled it off, you can just trim it with your knife.

Now that the legs, wings, neck and breast are all skinned I firmly hold the neck of the chicken and pull the skin down and off the back.

Firmly pull the skin right off the chicken's back in a swift movement. If it doesn't want to detach on it's own, cut it off but leave the tail feathers behind for the next step.

Now all you should be left with are the tail feathers which I use as a trail map for the final step of skinning a chicken.

Before I can open up the chicken to remove the insides, I have to go to the neck and separate the esophagus from the neck so it can be pulled through from the inside.

At the end of the breast bone I pull the meat away from the chicken make a shallow cut being careful not to cut into an intestine.

This hole is just big enough to get my fingers in and really pull the chicken apart. These roosters are really quite small at 12 weeks as they aren't a meat breed but it's still easy to pull the ribs up to expose the inside.
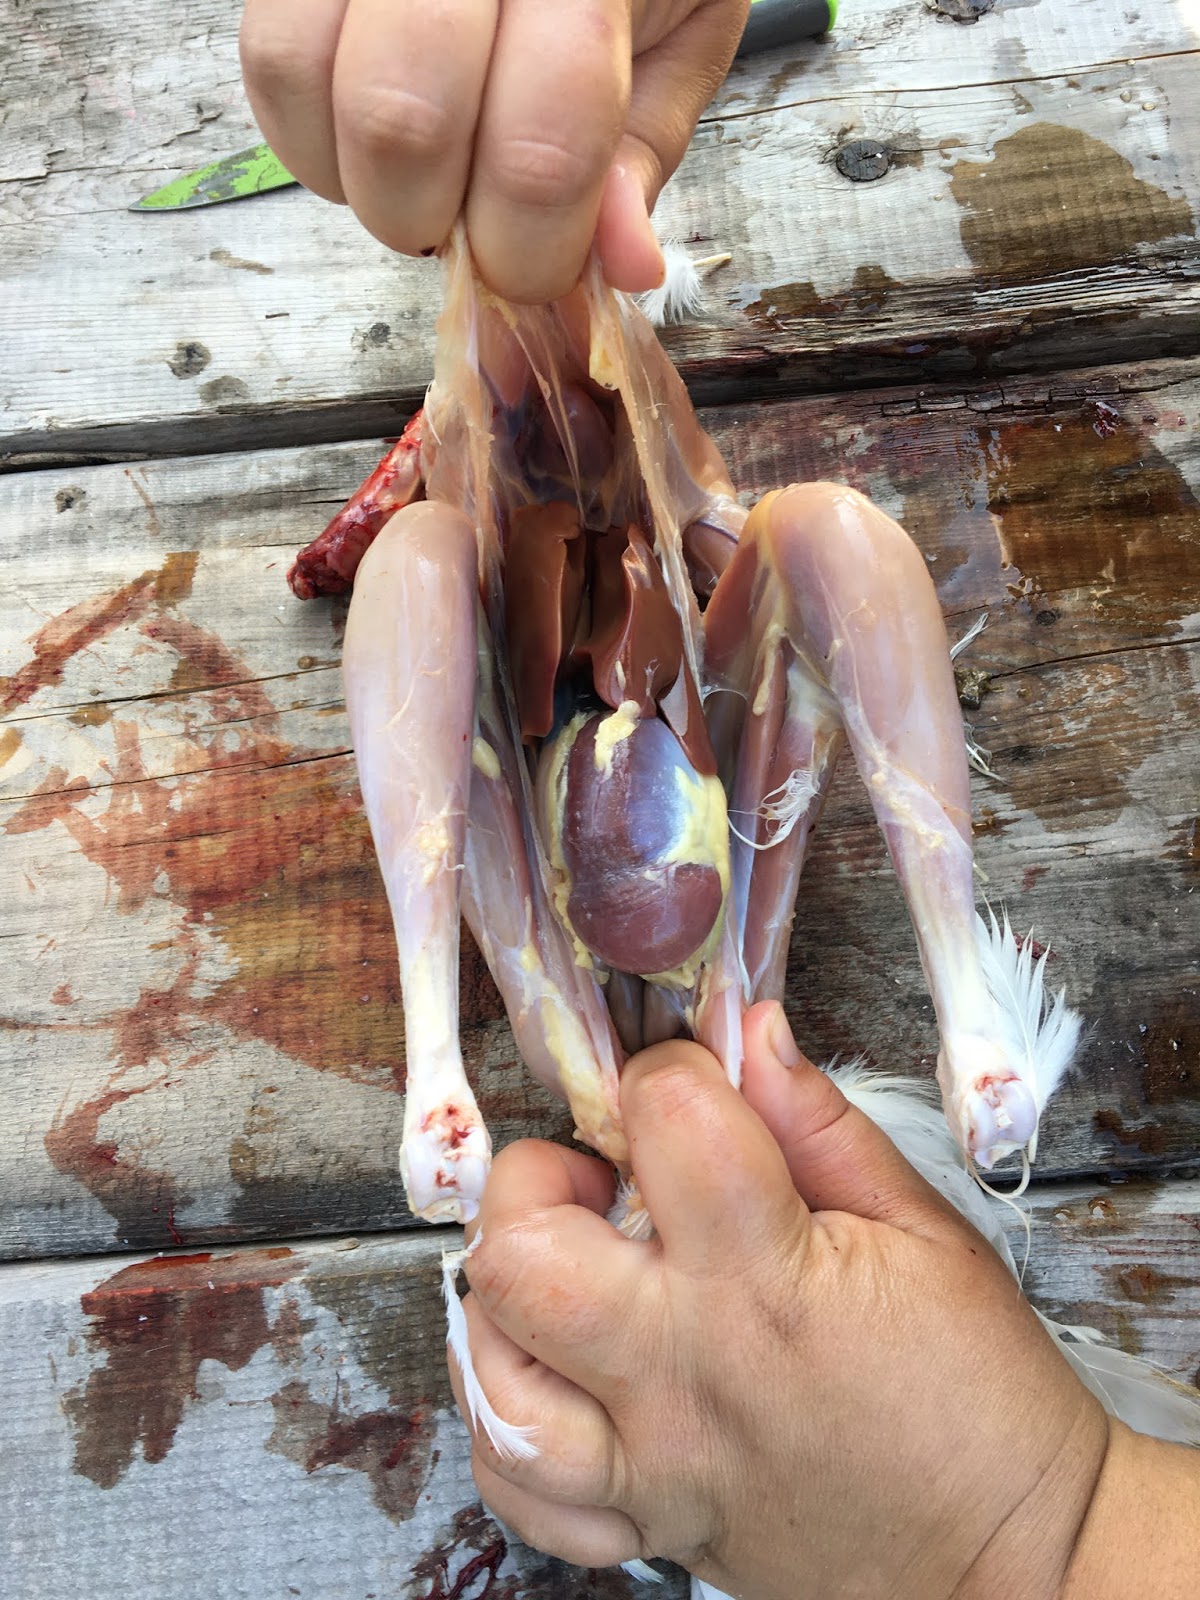
Don't be afraid to really pull it apart.

Next I go in with my hand to pull out all the organs. I do this at the edge of the counter so It can hang above the slop bucket. It's all still attached at the bum and tail feathers for a bit.

After most of the organs are pulled out of the way, I reach up for the crop, or stomach, and the esophagus I loosed earlier.

At this point, the organs and tail feathers are all in this last little bundle. I do it this way so I don't accidentally get poop on the meat or cut the intestines which can spoil the meat.

I use this leftover bit with organs and tail feathers as a road map for the final cuts. There is a back bone that I cut right up against.

I cut down one side of the bone, then the other side of the tail.

And lastly, one cut to detach the tail from the backbone. I go back in to pull the little kidneys you can still see inside, and the lungs which are bright pink and are nestled in the back of the ribcage.

You have butchered a chicken! I give it a really good rinse, remove any last feathers and voila! From this point you would normally place it in a cooler with water, ice and a splash of vinegar while you continue to butcher and then later bag and freeze.
But because we are off grid and don't have a freezer, they go directly into a boiling pot of water to cook. We de-bone them and pressure can the meat and the bones further simmer into a nutrient rich broth which we later pressure can. The the left over bones go into the garden as bone meal!
Here are some of our favourite chicken meals that aren't roasted chicken:


Just as the garden comes alive and the lush green produce is about to spill onto your counters, it is time to start your fall crops. By planting a second crop, you'll be able to harvest right up until the cold arrives. In this post I am sharing all my best tips to help you plan a fall garden to keep you elbow deep in produce for as long as possible.
Starting your own backyard garden is rewarding to say the least. Not only does backyard vegetable gardening supply you with fresh nutritious homegrown produce, it has proven to lower stress and make people generally happier. If you are new to vegetable gardening here are a few resources to get you started:
When should I start my fall garden crops?
This answer varies depending on your location, hardiness zone, and your first frost date which you can find with a simple google search.Once you know your first frost date, for our tiny farm can be as early as the fall equinox, you are able to browse through your seed packets to see what you still have time to direct sow before the frost arrives. Simply count the days until the first frost and find vegetables that grow to maturity in that time or less.

Even if the second crop you want to grow doesn't have enough time to fully mature, with the right planning you could start them in trays a few weeks prior to transplanting out into the garden when you pull out your summer crops like onions, garlic, kale, swiss chard etc.
What types of vegetables should I grow in my fall garden?
A fall garden is a great opportunity to replant some of the crops that didn't grow well in your garden, or didn't germinate well. It's a second chance for your garden so pull out what didn't work and try again! Some plants actually prefer to be grown in a fall garden because they are able to germinate in the warm long sunny days and mature when the days are cooler and shorter which can make some varieties sweeter.
Of course you are going to want to grow what you already know you'll eat and love. But here is a list of a few shorter season, cool weather crops that are typically grown in a fall garden:
Of course you are going to want to grow what you already know you'll eat and love. But here is a list of a few shorter season, cool weather crops that are typically grown in a fall garden:
Arugula
Beets
Chives
Cilantro
Kale
Mustard
Peas
Radishes
Scallions
Sweet Peas
Swiss Chard
Turnips
I also like to take the opportunity to amend our raised garden boxes with rabbit manure or compost when planting any fall crops to ensure the soil isn't completely depleted of energy and add to my garden planner any information about when and what I planted!
If you would like a little guidance on growing a vegetable garden, I really do recommend getting my Garden Planner here. This will help you determine what your garden goals, will help you layout your garden, keep track of when you should sow, transplant, harden off all your seedings and has a journal you can look back to over the years to help you keep track of certain dates like frosts, or heavy rainfall.
I hope this post was helpful and inspires you to keep growing throughout the season!


We have created a monster. A dill pickle monster that can clean off a quart jar of pickles in a day, easily. I don't blame him, they are tasty, but keeping the pantry stocked with dill pickles is an annual task I actually enjoy!

Recently a friend asked if I wanted to pick any of his Black Currants to make jam and my first thought was 'I didn't realize currants came in different colours'. I was hesitant. I'm not sure why, maybe it felt like an elderly person food like liver, or prunes, I have no idea... But it's damn delicious and right up there with Strawberry Rhubarb Jam! After he kindly gave us a jar to taste test as a family, we all agreed we needed to take advantage of this free food and preserve it for the winter months.
If you are new here, we live off the grid in a tiny farmhouse we built from scratch, without a refrigerator. Learning to forage and grow our own food and preserving our harvest without a fridge is necessary for our survival and its a way of life out here in the forest.

It wasn't too long before we were back with a basket of these black currants and their floral aroma filling our home. We ended up going back the next day to grab more for another batch in the pantry. Needless to say, we are set for jam until Strawberry season next year! We're on our way to food independence, folks!
Making the Black Currant Jam is quite easy and similar to making any other jam although it has a thicker texture to it which I imagine would be great for those short bread thumbprint cookies I've never made.

Black Currant Jam Recipe
Makes about 8 half pints
You'll need:
8 cups of freshly picked Black Currants3/4 cup of filtered water
5 cups of sugar
Powdered* or Liquid Pectin**
Method:
Prepare your water bath canner on the stove to boil and start sterilizing your clean canning jars.I also like to get ready another small pot of water with the lids nesting in the rims and set that aside on the counter and when the jam is done cooking, then I place this pot on the burner and turn the heat low. This ensures I don't over boil the seal on the lids.
In a large pot, you will need to boil the Black Currants with the water and smash with a potato masher to break the berries open and release the juices for about 5 minutes.
Add sugar and bring to a boil for 5 minutes. *If using Powdered Pectin, add with sugar. **If using Liquid Pectin add after the berries and sugar have been boiling for 5 minutes.
Remove from heat and place pot with rims and lids on low heat.
Carefully take your jars out of the canner and fill your jars with jam.
Wipe rims of the jars with a damp cloth and vinegar.
Place lids and rims on jars and slightly tighten.
Water bath can for 10 minutes.
Remove from canner onto a counter and tea towel to cool.

How do you get internet when living off grid!
By The Petite Plantation - July 27, 2020

We are so connected these days so obviously one of the first questions we get asked about living off the grid is how we are able to stay connected to the internet when cable and phone line services aren't available. There are actually a few different options to stay connected to the internet but do you really want to be tied to the grid?
Usually when people are looking to move to an off grid living lifestyle, it is because they are tired of the grind, the man, the schedule and the control over their lifestyle. Although we are connected to the internet here on our tiny off grid farm, we often just don't turn it on. Cloudy days when our batteries are slow to fill, and beautiful sunny days when we want to be outside working on our farm as a family are just two reasons why we choose to not connect ourselves to the grind and the grid.
It's is ironic, in a way, because without the internet our off grid life would not have been possible as it has made earning a passive income to support our family and dreams a reality. It's a balance!
How to get internet off the grid:
I want to start by reminding you that we are all from different areas on the globe and some of these options may not be viable for you and the area in which you'll be settling. Being able to get internet off the grid is very important to our livelihood so we made sure we could get online before purchasing our property and if you are currently land shopping, be sure to find out if there is an internet solution before purchasing.
There are tiny devices you can plug into your laptop to give yourself a tiny mobile hotspot. In the US, these are actually quite affordable but in Canada they can vary from almost affordable to very costly. If this is an option you would like to consider, reach out to your cell phone providers in your area to shop around.

We are lucky to live in an area where we are able to get LTE Internet from a rural internet provider called Xplornet in New Brunswick, Canada. This internet stick, as I call it, faces towards a cell phone tower across the valley and gives us reliable internet similar to what your data on your cell phone would give you, but FAST!
We have the wireless modem connected to our humble solar system and it runs around 30 watts which is actually very little, but still our largest consumption of power. On cloudy days we only turn the internet on to 'check in' on our online business and leave it off during the day while we work around the farm outside. On rainy days, we will run the generator for an hour here or there as we are all stuck inside and choose to spend the day working online.
You could also just get an unlimited data plan added on to your cell phone plan and use your cell phone's personal hotspot to share the internet. Although this could drain your phone's battery and would only work if you had a good cell phone reception.
There are also other Satelite Internet Providers out there with a simple google search in the area you'll be settling, you'll be able to find a provider. If not, there is also libraries, coffee shops, and even hip laundromats which provider internet to their patrons.
I hope this helps you stay connected, if that's what you what you are looking for!
 |
| How to get internet off the grid |

Adding a greenhouse to your garden or homestead is a great way to extend your season, grow vegetables that require a more controlled environment and is a dream for many backyard gardeners. When we first started planning our homestead layout I was sure to save place for a dreamy greenhouse of our own and in the spring of 2020 we made it a reality for under $200!
We have made the building plans, shopping list, cut list and instructions available here for just a couple of dollars in our shop. Everything earned goes back into developing our tiny sustainable farm and into inspiring and encouraging others to live more sustainably.
We love that our greenhouse sits on top of raised hugelkultur garden beds to grow peppers, cucumbers and tomatoes inside and extends our growing season to grow spinach, kale and swiss chard in the winter months although these tender winter crops will need another layer of protection inside.
The floor is made with left over shale rock from our driveway which works to capture the heat of the sun throughout the day to passively heat the greenhouse on cool nights. It also gives the greenhouse a very charming cottage look which I am smitten over! You could also use sand, pea gravel or just the bare ground as well but using what we had around is money we didn't spend.
We chose to use 6mil plastic and staples to wrap our greenhouse which is essentially vapour barrier plastic and can be found at your local building supply store. It has held up remarkably well in the wind and rain but in the future we hope to add clear plastic roofing panels to ensure we can enjoy this green house for many many many years to come.
Other siding options include glass, salvaged windows (although they'll come in a variety of sizes and are tricky to frame around like a jig saw puzzle), polycarbonate or acrylic panels (expensive).
All together, the greenhouse cost us under $200 to complete. This doesn't include the white exterior paint we already had on hand to paint the frame of the greenhouse.

DIY Greenhouse Plans
With the help of my techy husband, we have been able to put the plans for our greenhouse together to help others make their dreamy greenhouse dreams a reality!
In this downloadable PDF you'll get:
- A shopping list with all the supplies you'll need to build your own dreamy greenhouse!
- A list of a few easy-to-use tools to complete the build!
- A cut list to ensure you get the most out of your lumber making this an affordable build!
- Detailed step-by-step instructions to easily build it yourself!
- Detailed photos and diagrams of the more complicated cuts for breezy assembly!
- Access to us! If you need help or get stuck, hop on over to instagram and send us a message!
If you would like to build your own greenhouse, the building plans, shopping list, cut list and instructions available here for just a couple of dollars in our shop.
Lastly, don't forget to add the twinkle lights!
